
I love chevrons -crocheting them makes my heart happy, so I knew I wanted to make a wrap using them. I also know that crocheting chevrons can be intimidating, so I created a video tutorial to guide you through the process.
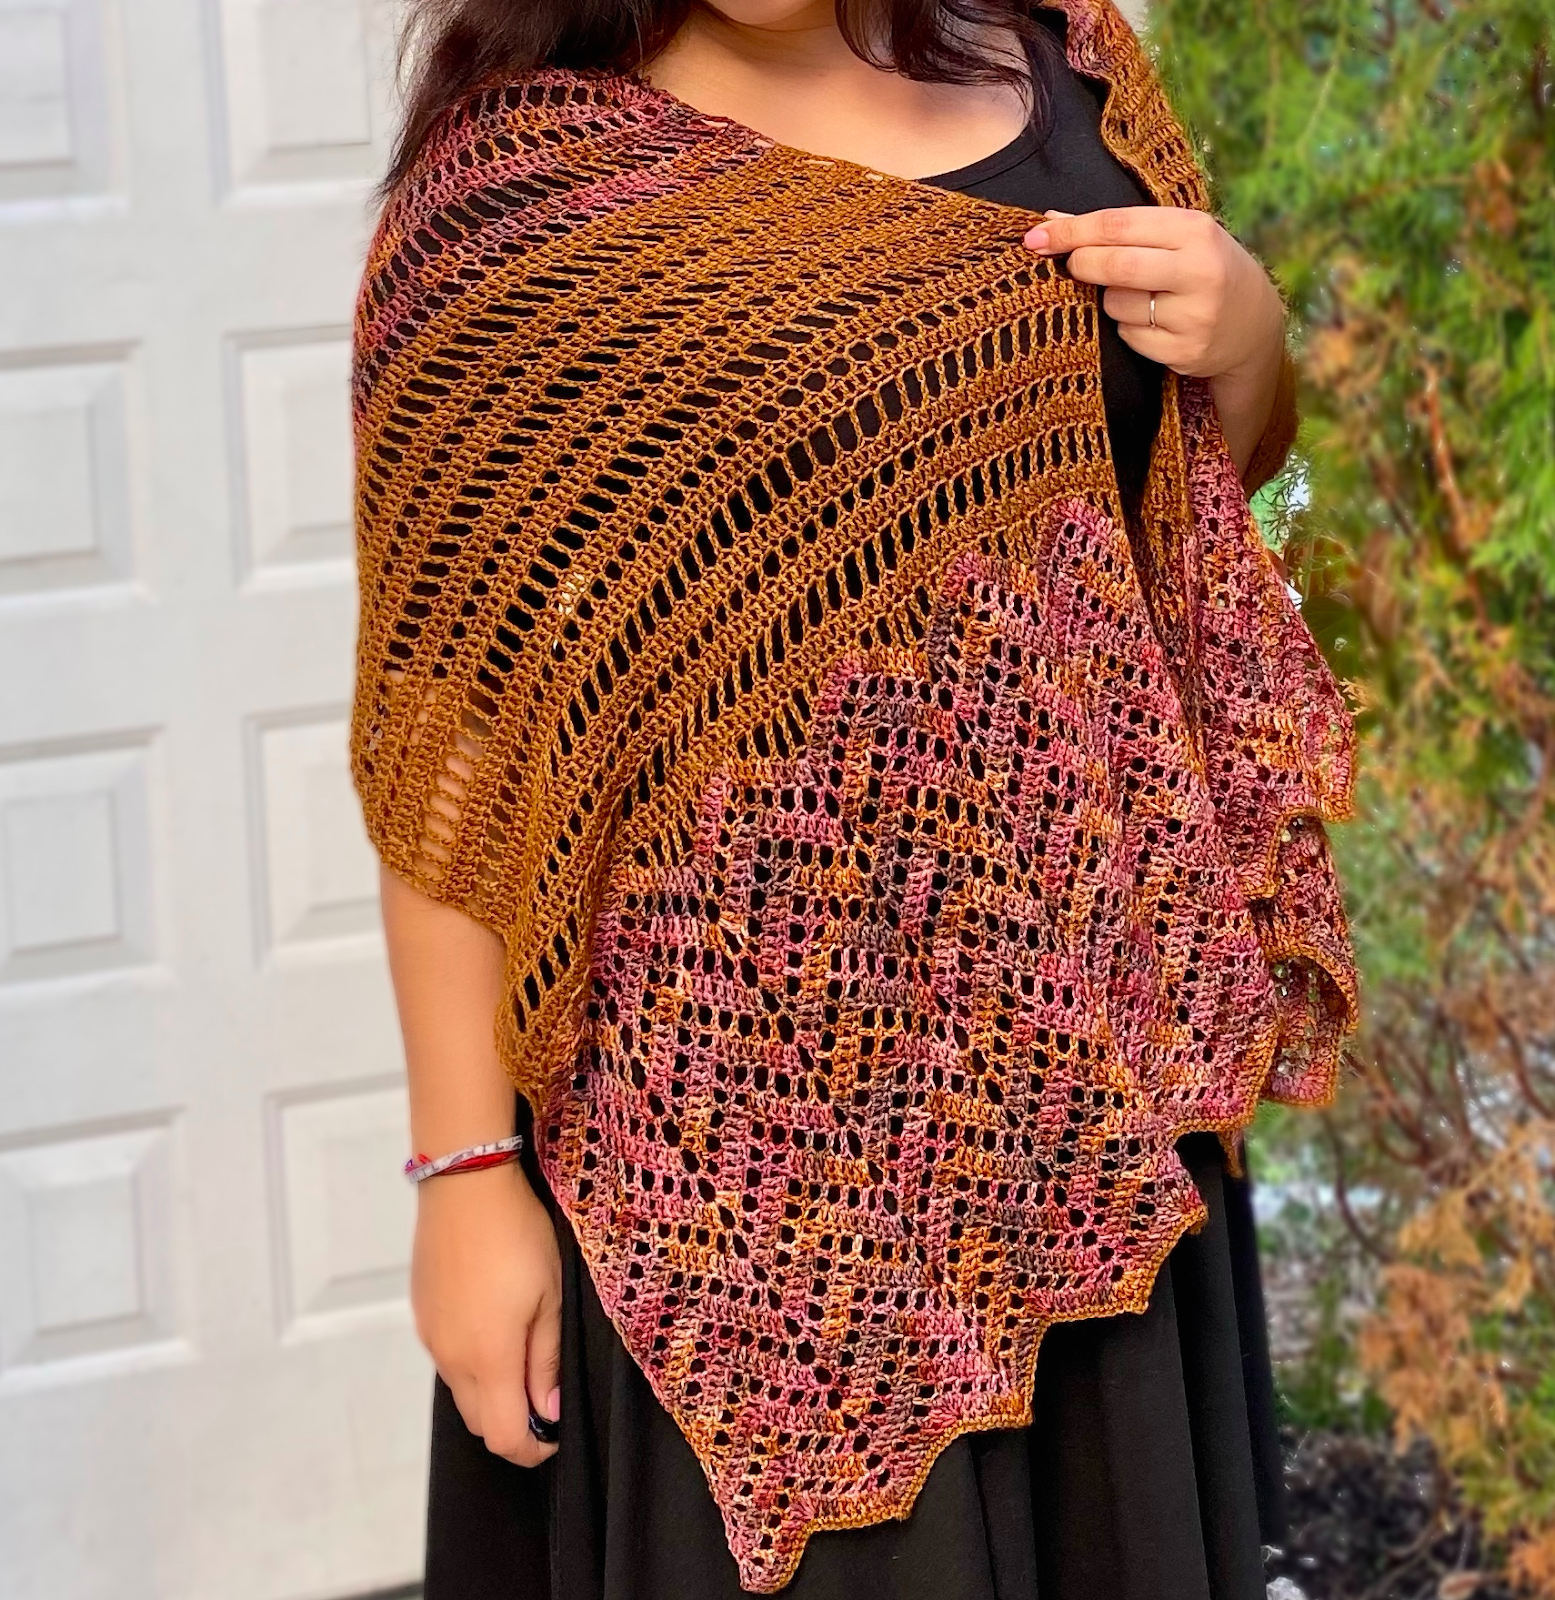
I had wonderful pattern testers help me with this – if you are curious, check out the #autumnstollwrap on Instagram. You can also check out my profile here. This wrap is also such a quick work up that I’ve made two! One is the two color version above, and the second is the monochromatic version below:

The monochromatic version uses a lovely Malabrigo Sock – check out the yarn details below for information on both versions.
I have fallen so in love with this pattern that I want to share it with the world! The only way I can do that is to offer it as a free pattern!
If you’d prefer to purchase an ad free PDF version, you can either do that through Ravelry or Payhip.
There is also a video tutorial to go long with it – you can watch it here:
What you’ll need:
- 200 g of fingering weight yarn
- 3.5 mm crochet hook
- Gram scale
- Stitch marker
- Scissors
- Tape measure
Yarn notes: I used 458y or 99 g in Enchanted Garden by The Frosted Stitch (Snowflake Sock) and 376 y or 94g in Prowl by Explorer Knits Fibers (Denali Sock).
For the second shawl (as seen in the video), I used 810 y or 184 g Malabrigo Sock in Botticelli Red.
This pattern can be made in any number of ways – a single color, two colors, or a fade. Let your creativity roam free with this one!
Final measurements after blocking: Approximately 67” by 17”
Abbreviations (in US terms):
- Ch(s) – Chains
- Dc – Double crochet
- Dc2tog/3 – Double crochet 2 together over 3 stitches
- Dc2tog/5 – Double crochet 2 together over 5 stitches
- Dc5tog – Double crochet 5 together
- DTr – Double Treble crochet
- Hdc- Half double crochet
- Sc – Single crochet
- Sk- Skip
- Sl st – Slip stitch
- Sp – Space
- St(s) – Stitch(es)
- Tr – Treble crochet
Special Stitches:
Dc5tog/5: *Yarn over, pull up a loop. Yarn over and pull through two.* You will have 2 loops on your hook. Repeat * to * in the next 4 sts. You will have 6 loops on your hook. Yarn over and pull through all 6 loops.
Dc2tog/5: Yarn over, pull up a loop. Yarn over and pull through two (you will have two loops on your hook). Sk 3 sts, yarn over and pull up a loop in the next st. Yarn over and pull through two, then yarn over and pull through all 3.
Dc2tog/3: Yarn over, pull up a loop. Yarn over and pull through two (you will have two loops on your hook). Sk the next st, yarn over and pull up a loop in the next st. Yarn over, pull through two, then yarn over and pull through all 3.
Gauge:
Measured blocked
Main body 4” x 4”: 18 sts by 8 rows
Chevron: 8 rows per 4”
Gauge is not crucial in this wrap as long as your yarn (if using more than one color) is similar in weight and fiber content.
Pattern notes:
This is an intermediate pattern and does require you to be aware of your st counts!
- The beginning ch 2 counts as Dc.
- The beginning ch 3 counts as Dc, ch 1.
- The beginning ch 4 counts as Tr, ch 1.
- The beginning ch 5 counts as a Dtr, ch 1.
- The ch 3 at the top of the chevron counts as 3 stitches towards st count.
- When working on the row after a mesh row, always place your st in the ch sp from the previous row, not in the stitch itself.
- The wrap ends are not mirror images – the chevrons are constructed a little differently on each end.

Optional color changes:
You can change your colors as you please. For the wrap pictured above, I changed colors as follows:
Use Color 1 for Beginning Chevron section. Change to color 2 at the end of the last chevron row and use Color 2 for the Transition 1 section. Continue with Color 2 through the Main Body until Row 17.
Change to Color 1 for Rows 18-26.
Change to Color 2 for Rows 27-44.
Change to Color 1 for Rows 45-53.
Change to Color 2 for Rows 54-72.
Use Color 2 for the Transition 2 section, then switch to Color 1 for the Ending Chevron Section.
Change to Color 2 for the Optional Picot Border.
Pattern:
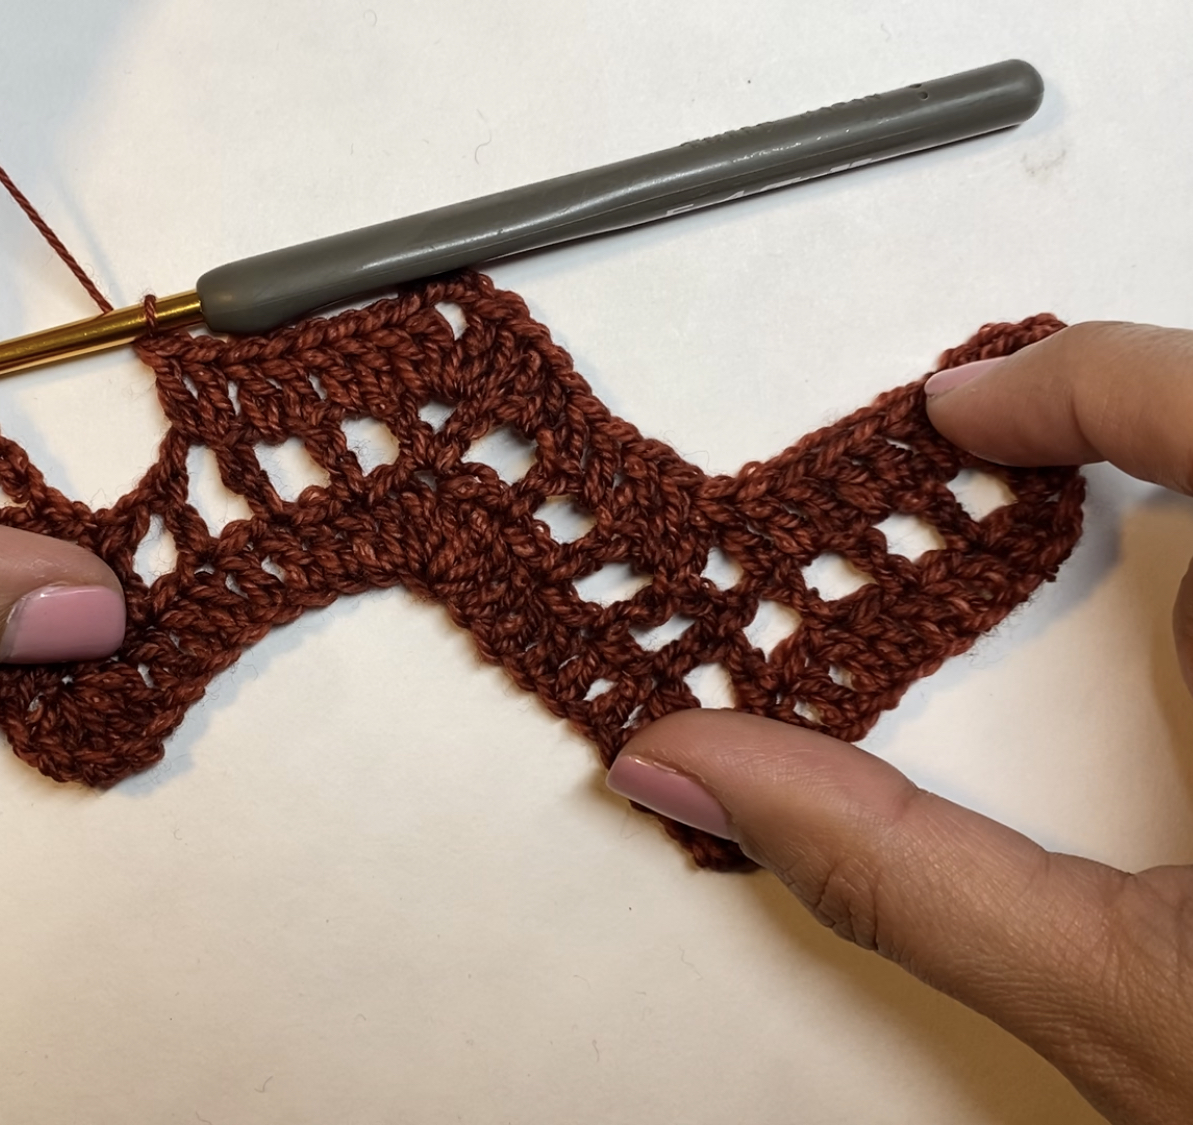
Beginning Chevron Pattern:
Row 1: Loosely ch 123. In the third ch from the hook, place 2 Dc. *Dc in the next 7 chs. Dc5tog over the next 5 chs. Dc in the next 7 chs, in the next ch place 5 Dc.* Repeat * to * until you have 20 chs left. Dc in the next 7 chs, Dc5tog, then Dc in the next 7 chs. Place 3 Dc in the last ch. Turn your work. (121 sts)

Row 2: Ch 3, Dc in the first st. (*Ch 1, sk 1, Dc.* Repeat * to * 2 more times. Ch 1, sk 1, Dc2tog/5, then repeat * to * three times. Ch 1, sk 1, [Dc, ch 3, Dc] in the next st). Repeat () until you have 20 sts remaining. Repeat * to * three times, then Ch 1, sk 1, Dc2tog/5. Repeat * to* three times, Ch1, sk 1, then in the top of the turning ch, place a Dc, ch 1, Dc. Turn your work. (121 sts)
Row 3: Ch 2, 2 Dc in first st. Dc in the next 7 sts and ch sp, *Dc2tog/5. Dc in next 6 sts. (2dc, ch3, 2dc) in the ch 3 sp, Dc in the next 6 sts.* Repeat * to * until you have 13 sts remaining. Dc2tog/5, then Dc in the next 7 sts, 3 Dc in the second ch of the turning chain. Turn your work. (121 sts)
Row 4: Ch 3, Dc in first st. *Ch 1, sk 1, Dc*. Repeat * to * two more times. ( Ch 1, sk 1, Dc2tog/5. Repeat * to * three times. In the ch 3 sp, [Ch 1, Dc, Ch 3, Dc, Ch 1]. Dc in the next st, then repeat * to * two times). Repeat ( to ) until you have 14 sts remaining. Ch1, sk 1, Dc2tog/5, then repeat * to * three times. Ch1, sk 1, then in the top of the turning ch, place a {Dc, ch 1, Dc}. Turn your work. (121 sts)
Rows 5-21: Repeat Rows 3 and 4 eight more times, then repeat Row 3 again.
Transition 1 Section:
Row 1: Ch 1 and turn your work. Sl st into the first st. Sk 1, *Sc, Sk 1, Hdc, Ch 1, Sk 1, Dc, Ch 1, Sk 1, Tr, Ch 1, Sk 1, Dtr, Ch 1, Sk 1, Tr, Ch 1, Sk 1, Dc, Ch 1, Sk 1, Hdc, Sk 1, Sc, Sl st into the ch sp*. Repeat * to * until 19 sts remain. Sc, Sk 1, Hdc, Ch 1, Sk 1, Dc, Ch 1, Sk 1, Tr, Ch 1, Sk 1, Dtr, Ch 1, Sk 1, Tr, Ch 1, Sk 1, Dc, Ch 1, Sk 1, Hdc, Sk 1, Sc, Sk 1, Sl st into the top of the turning ch. Turn your work. (97 sts)
Row 2: Ch 2. Beginning in the 2nd st, Dc into the next 6 sts and ch sp. *Dc2tog/3 (this will be in the ch sp before and after the Dtr). Dc into the next 13 sts and ch sp.* Repeat * to * until 10 sts remain. Dc2tog/3, then Dc in the next 7 sts. Turn your work. (85 sts)

At this point, weigh your shawl. Mark down how many grams you used – you will need to reserve this plus 3 grams for the last parts of the shawl.
Main Body:
Please remember that the initial chs count as the first st.
Row 1: Ch 3. Sk 1, then Dc in the 3rd st. **Ch 1, Sk 1, Dc.** Repeat ** to ** until the end of the row. Turn your work. (85 sts)
Row 2: Ch 2. Place a Dc in the ch sp and each sts and ch sp of the row. Turn your work. (85 sts)
Row 3: Ch 4. Sk 1, then Tr in the 3rd st. *Ch 1, Sk 1, Tr.*. Repeat * to * until the end of the row. Turn your work.
(85 sts)
Row 4: Repeat Main Body Row 2.
Repeat Main Body Rows 1-4 until the remaining yarn you have is the same weight as the part you weighed, plus 3 g. For example, if the Beginning Chevron and Decreasing sections weighed 36 g, stop with the main body when you have 39 g (36 + 3) left. You will also need to stop at either Row 2 or Row 4. If you’d like a longer wrap, you may add a 3rd skein of yarn.
Transition 2 Section:
Row 1: Ch 5, *Tr, Ch 1, Sk 1, Dc, Ch 1, Sk 1, Hdc, Ch 1, Sc, Sl st, Sc, Ch 1, Hdc, Ch 1, Sk 1, Dc, Ch 1, Sk 1, Tr, Ch 1, Dtr, Ch 1*. Repeat * to * ending on a Tr, Ch 1. You will have one stitch remaining, which is the turning ch from the previous row. Dtr in the last st. Turn your work.(109 sts)

Ending Chevron Section:
Row 1: Ch 2, 2 Dc in the first st. Dc in the next 7 sts and ch sp then * Dc2tog/3 sts. Dc in the next 7 sts. In the next st, place (2 Dc, Ch 3, 2 Dc). Dc in the next 7 sts.* Repeat * to * until 11 sts remain. Dc2tog/3 then Dc in the next 7 sts. In the last st, place 3 Dc on the fourth ch of the turning chain. Turn your work. (131 sts)
Row 2: Ch 3, Dc in the first st. (*Ch 1, sk 1, Dc.* Repeat * to * 2 more times. Ch 1, sk 1, Dc2tog/5, then repeat * to * three times. Ch 1, sk 1,[ Dc, ch 3, Dc] in the ch 3 sp). Repeat () until you have 20 sts remaining. Repeat * to * three times, then Ch 1, sk 1, Dc2tog/5. Repeat * to* three times, Ch1, sk 1, then in the top of the turning ch, place a {Dc, ch 1, Dc}. Turn your work. (121 sts)
Row 3: Ch 2, 2 Dc in first st. Dc in the next 7 sts and ch sp, *Dc2tog/5. Dc in next 6 sts and ch sp. (2dc, ch3, 2dc) in the ch 3 sp, Dc in the next 6 sts and ch sp.* Repeat * to * until you have 13 sts remaining. Dc2tog/5, then Dc in the next 7 sts and ch sp, 3 Dc in the second ch of the turning ch. Turn your work. (121 sts)
Row 4: Ch 3, Dc in first st. *Ch 1, sk 1, Dc*. Repeat * to * two more times. ( Ch 1, sk 1, Dc2tog/5. Repeat * to * three times. In the ch 3 sp, [Ch 1, Dc, Ch 3, Dc, Ch 1]. Dc in the next st, then repeat * to * two times). Repeat ( to ) until you have 14 sts remaining. Ch1, sk 1, Dc2tog/5, then repeat * to * three times. Ch1, sk 1, then in the top of the turning ch, place a {Dc, ch 1, Dc}. Turn your work. Turn your work. (121 sts)
Rows 5-20: Repeat Rows 3 and 4 again 8 more times
Row 21: Ch 2, 2 Dc in first stitch. Dc in the next 7 sts. *Dc5tog/5, then Dc in the next 6 sts. Place 5 Dc in the ch 3 sp from the previous row. Dc in the next 6 sts.* Repeat * to * until you have 13 chs left. Dc5tog/5, then Dc in the next 7 chs. Place 3 Dc in the second ch of the turning ch. Turn your work. Tie off or continue to the optional border below. (111 sts)
Optional modified Picot stitch border:
Sl st into the first st, or continue from Row 21 if there is no color change. Ch1, Sc in the first st, then Sc until you reach the top of the Chevron. *In the middle stitch, Sc, ch 3, Sc. Sc in the next st, then in each st until you reach the top of the next chevron.* Repeat * to * until the end. Repeat on the other side.

Final Notes:
It is very important to block this garment! This will open up the stitches to give it that lacy look. I recommend soaking the garment in cool water for 20 minutes in a non-wash rinse such as Eucalan or Soak. Do not wring or twist the garment, but instead roll it in a towel to get rid of any excess water. If you would like to open up the stitch pattern more, I recommend using pins or a blocking board. If you wait to weave in your ends until after blocking, you will have less pucker or pull in the garment. I love my blocking boards from We Crochet – find them here.
I hope you enjoyed making the Autumn Stroll Wrap. Please tag me @thecraftycrochetier and #autumnstrollwrap on Instagram – I’d love to see your finished work!
You are welcome to use the results of this pattern in social media, but please give credit to The Crafty Crochetier. You may sell the results of this pattern, but please give credit to The Crafty Crochetier. You may not copy this pattern for your own website or sell the pattern itself.
I hope you enjoyed this pattern! Please let me know if you have any questions in the comments below. If you found this post helpful, consider buying me a coffee. Thanks and Happy Crocheting!
xoxo Serena
p.s. This blog may contain affiliate links. If you click on the link and purchase an item, I may receive a small commission at no cost to you.
